
EricBayArea
Well-known member
I got a bit annoyed (at the Leaf) that my backseat passengers were having an awfully difficult time buckling their seatbelt and me trying to come up with excuses, that I did something about it. I thought that if I could somehow prop the seatbelt up or keep it from falling down, that I could somehow solve the disappearing seatbelt receiver problem.
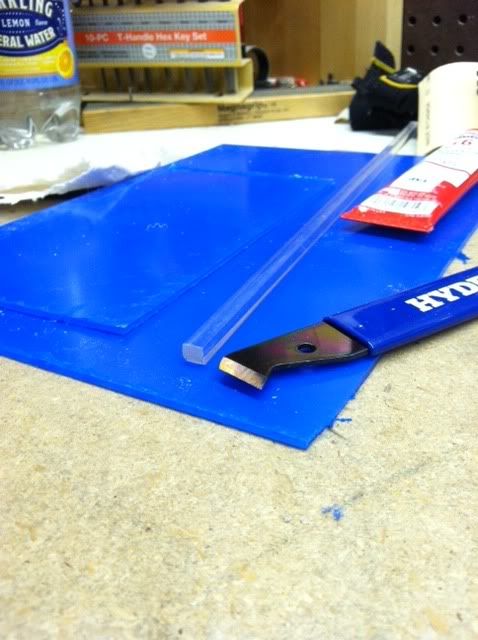
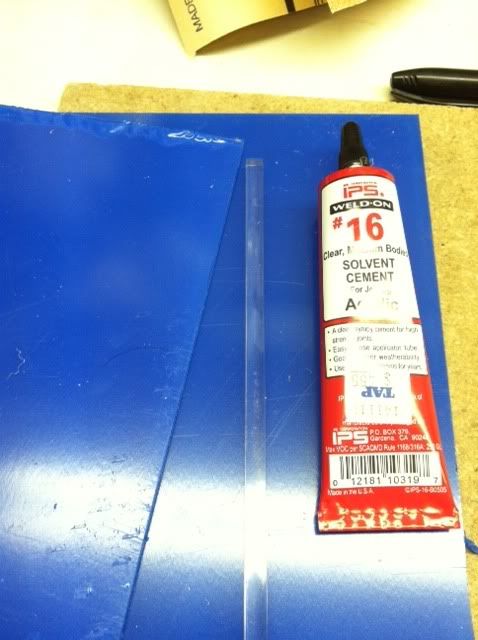
I went to my local plastic store (TAP) and picked up the following things:
-Plastic sheet from the scrap bin
-Square plastic dowel from another scrap bin
-Plastic scorer (to cut the plastic)
-Glue
From having my leather installed I saw that the lower part of the rear seat is only held on by 2 pressure clips. This made it very easy to take out. Grab the seat at the front, at the 1/3 and 2/3 position... basically if you sat in the center seat in the back, the place on the bench to the left and right of you... towards the front. Just give it a couple of yanks and you'll hear the clips come lose. You'll need to push the seat belt receivers (female portion) into the seat so that you can lift it up in front, and then out. Don't worry, there's nothing to break.
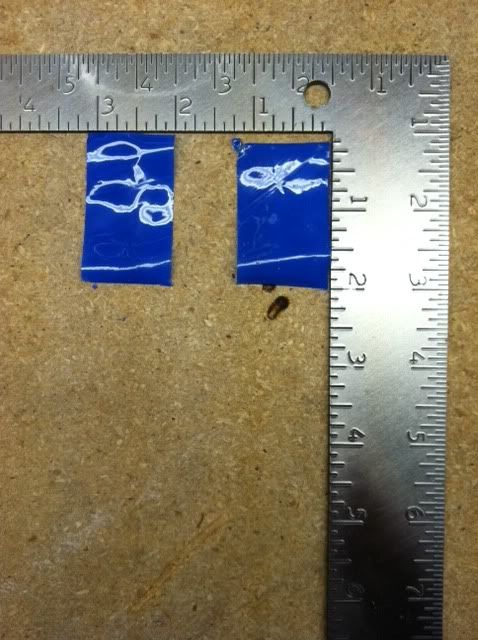
Once I had them out I tackled the left-side first. Basically the left side is a single female receptacle so I had the idea of creating an elongated C shape with the plastic. One sheet of plastic, one dowel and a second sheet of plastic. After a few trial and errors, I found a size that worked well:
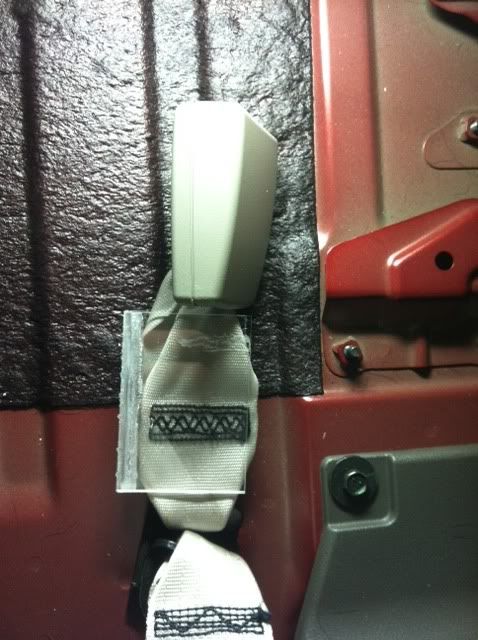
As you can see, the piece goes from the bottom of the seatbelt receptacle to just above the bolt that holds it down. After sliding it on like that, I wrapped some duct tape around it to make sure it didn't slide off.
For the other side (sorry, no pictures) I realized I couldn't do the same thing, simply because I now had 2 seat belt parts to contend with and I didn't feel comfortable gluing multiple dowels on top of one another. So what I decided to do was give it some rigidity by taking 2 pieces of plastic, and fastening them (i.e. duct taping them) around the seat belt cloth part - the same part that I put my plastic reinforcement around in the above shots.
I took two small pieces that were about the size of the seat belt cloth from the bottom of the receptacle to the bolt, wrapped them individually with duct tape and then duct taped them around the 2 cloth seat belt straps (below the receptacle... much like a splint for a broken bone. These are the sizes I used:
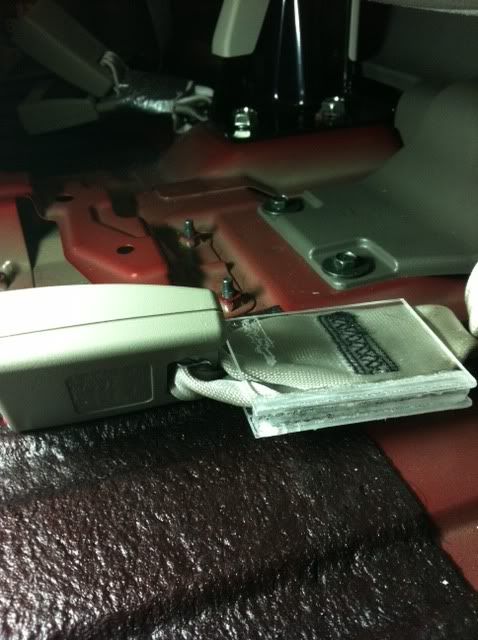
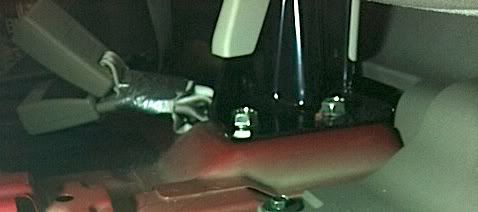
From one of the above pictures I was able to extract the following photo. It's a bit out of focus but it should give you the idea of what the finished product looks like. Again, I did not duct tape the seat belt cloth directly, I taped the plastic which I used to sandwich the cloth straps:
Once I had everything in place, I put it all back together. The most difficult part is fishing the seat belt receptacle through the seat cushion. The trick I found was have the seat cushion pointed upward at a 45 degree angle, reach under, and try to push one receptacle up at a time. Once it's visible from on top, clip the seat belt in and pull it up by pulling on the seat belt itself. Then repeat. Line up the clips and push down - you'll hear them clip back in.
Make sure the seat belt receptacles are as far up as they can go so the supports are as vertical as possible and viola - no more frustrated passengers (and driver!)
Hindsight...
-I did not really need to glue the dowel in place like I did for the single seat belt - the improvised splint worked just fine. I think splinting the seat belt strap with plastic and duct tape would be just fine (and quicker).
-Make sure that the plastic piece is about the same width as the strap. If it is much wider you may risk not being able to have it slide up into the seat. If it is not wide enough, you'll end up taping the seat belt strap - although you will never see it so it's not that big of a deal.
I went to my local plastic store (TAP) and picked up the following things:
-Plastic sheet from the scrap bin
-Square plastic dowel from another scrap bin
-Plastic scorer (to cut the plastic)
-Glue
From having my leather installed I saw that the lower part of the rear seat is only held on by 2 pressure clips. This made it very easy to take out. Grab the seat at the front, at the 1/3 and 2/3 position... basically if you sat in the center seat in the back, the place on the bench to the left and right of you... towards the front. Just give it a couple of yanks and you'll hear the clips come lose. You'll need to push the seat belt receivers (female portion) into the seat so that you can lift it up in front, and then out. Don't worry, there's nothing to break.
Once I had them out I tackled the left-side first. Basically the left side is a single female receptacle so I had the idea of creating an elongated C shape with the plastic. One sheet of plastic, one dowel and a second sheet of plastic. After a few trial and errors, I found a size that worked well:
As you can see, the piece goes from the bottom of the seatbelt receptacle to just above the bolt that holds it down. After sliding it on like that, I wrapped some duct tape around it to make sure it didn't slide off.
For the other side (sorry, no pictures) I realized I couldn't do the same thing, simply because I now had 2 seat belt parts to contend with and I didn't feel comfortable gluing multiple dowels on top of one another. So what I decided to do was give it some rigidity by taking 2 pieces of plastic, and fastening them (i.e. duct taping them) around the seat belt cloth part - the same part that I put my plastic reinforcement around in the above shots.
I took two small pieces that were about the size of the seat belt cloth from the bottom of the receptacle to the bolt, wrapped them individually with duct tape and then duct taped them around the 2 cloth seat belt straps (below the receptacle... much like a splint for a broken bone. These are the sizes I used:
From one of the above pictures I was able to extract the following photo. It's a bit out of focus but it should give you the idea of what the finished product looks like. Again, I did not duct tape the seat belt cloth directly, I taped the plastic which I used to sandwich the cloth straps:
Once I had everything in place, I put it all back together. The most difficult part is fishing the seat belt receptacle through the seat cushion. The trick I found was have the seat cushion pointed upward at a 45 degree angle, reach under, and try to push one receptacle up at a time. Once it's visible from on top, clip the seat belt in and pull it up by pulling on the seat belt itself. Then repeat. Line up the clips and push down - you'll hear them clip back in.
Make sure the seat belt receptacles are as far up as they can go so the supports are as vertical as possible and viola - no more frustrated passengers (and driver!)
Hindsight...
-I did not really need to glue the dowel in place like I did for the single seat belt - the improvised splint worked just fine. I think splinting the seat belt strap with plastic and duct tape would be just fine (and quicker).
-Make sure that the plastic piece is about the same width as the strap. If it is much wider you may risk not being able to have it slide up into the seat. If it is not wide enough, you'll end up taping the seat belt strap - although you will never see it so it's not that big of a deal.