
You are using an out of date browser. It may not display this or other websites correctly.
You should upgrade or use an alternative browser.
You should upgrade or use an alternative browser.
Onboard charger capacitors failed
- Thread starter sujeeva
- Start date
Help Support My Nissan Leaf Forum:
This site may earn a commission from merchant affiliate
links, including eBay, Amazon, and others.
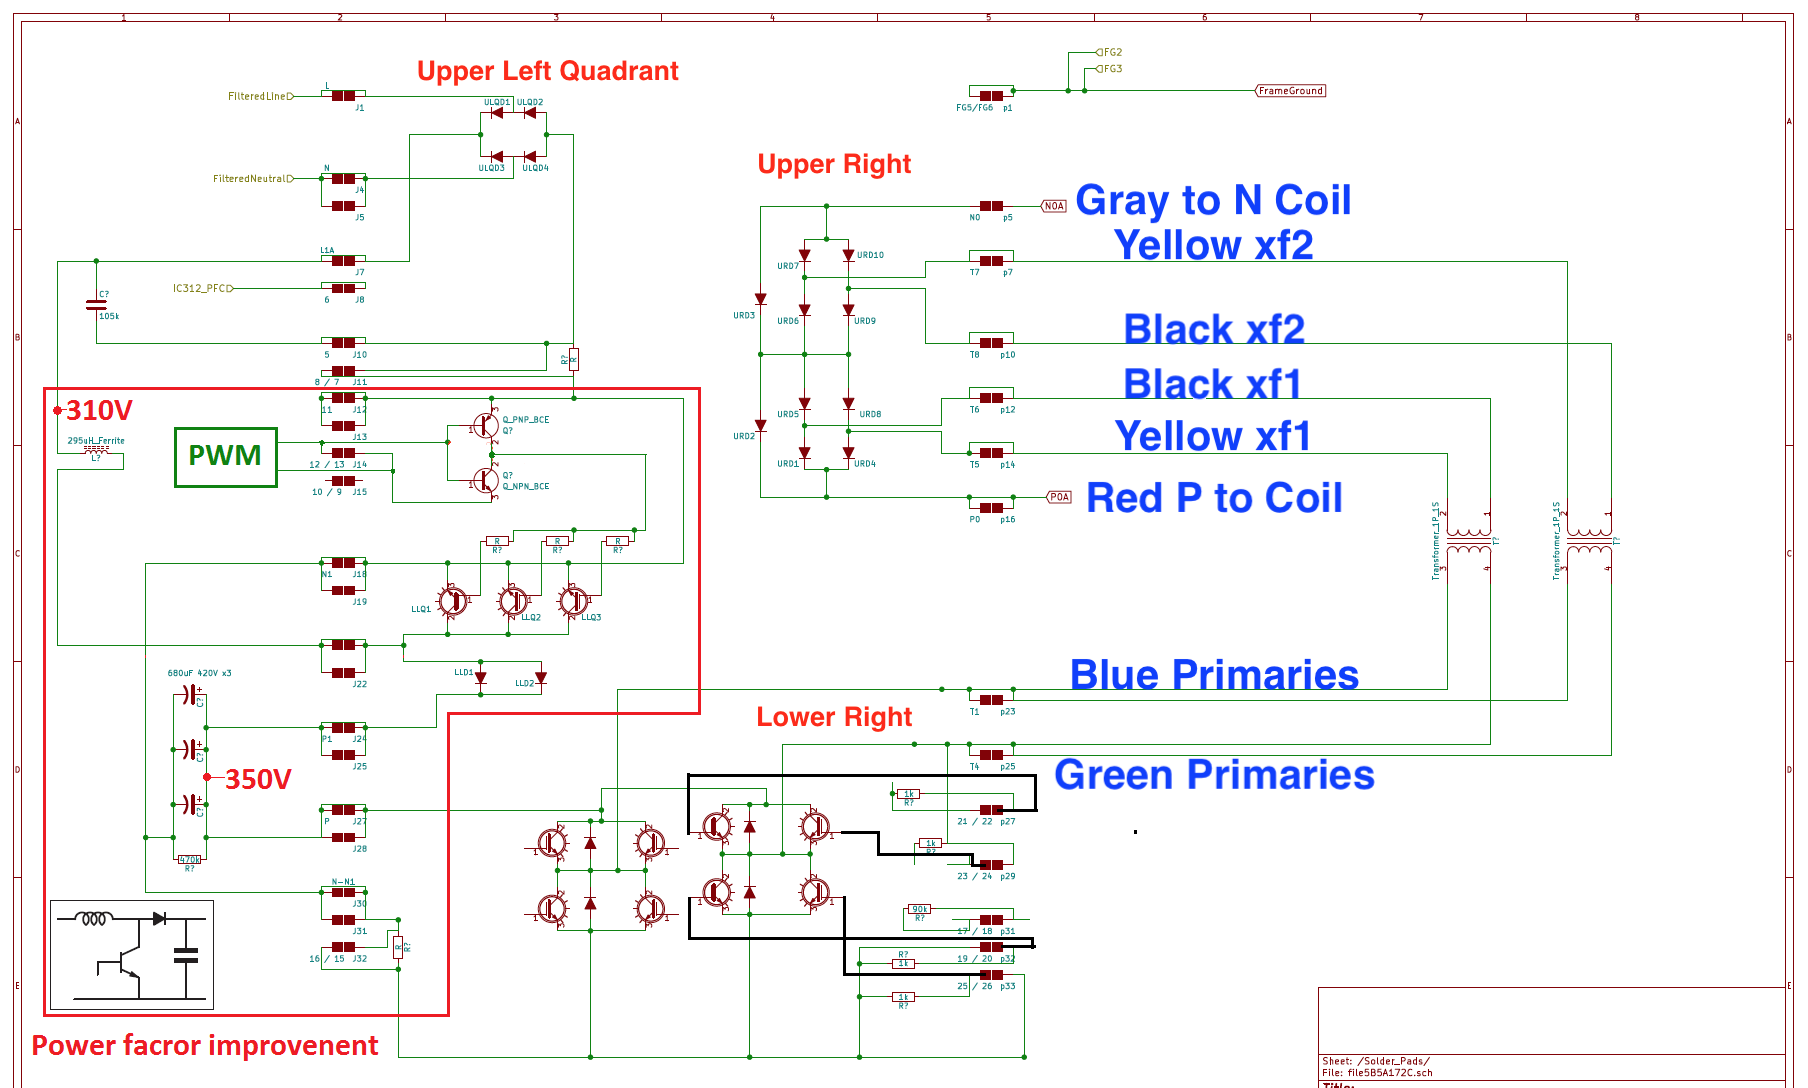
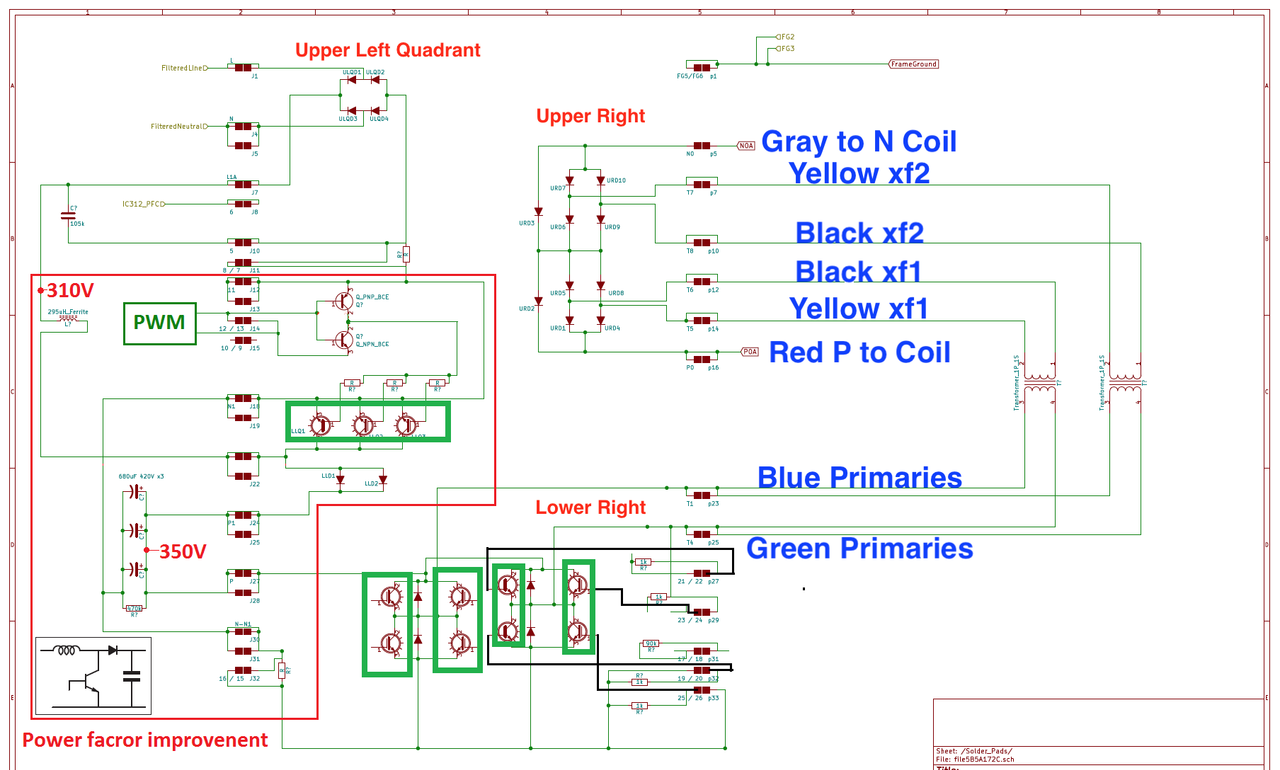
This schematic is on page 1 of my OBC troubleshooting thread. The black epoxy on the waffle plate is very difficult to remove, let me know if you find a way to do it. The part number of the 600V 20A diodes is Shindengen DF20L60; The IGBTs were identified but i can't remember just now, will have to get back to you.
Thenk you for this schematic.
I also see on the plate 3 big resistors 1 black relay and 1 big 310v 1.0 mf capasitor. I want to know what is function of relay and also want to see the schematic of them.
Whare can i see the waffle plates igbt models?
I also want to know, if it posible whare can anyone buy thet waffle plate a new one.
Anyone have repaired thet waffle plate?
coulomb
Well-known member
The relay is to short out the pre-charge resistors when pre-charge is over.shuma89 said:I also see on the plate 3 big resistors 1 black relay and 1 big 310v 1.0 mf capacitor. I want to know what is function of relay and also want to see the schematic of them.
There isn't a good schematic for the Nissan OBC, but it is fairly similar to the Mitsubishi iMiEV OBC, so you can use the schematic of the pre-charge circuit here as a guide. There is an index on page one of that topic to guide you to other topics that may be of interest.
While you may well be able to replace the input diodes with a bridge rectifier off the Waffle Plate™, I suspect that replacing the IGBTs will be impractical. You'll likely have to find a second-hand plate from another charrger, or perhaps a whole charrger from a wrecker. It's not clear to me that the iMiev Waffle Plate™ will be similar enough to the Nissan one.Where can i see the waffle plate's igbt models?
I've never hear of a source for a new plate.I also want to know, if it possible where can anyone buy the waffle plate a new one.
Someone did replace just some small capacitors in one; see the iMiev topic, near the end. For example, here. But that was a pretty mild repair compared with replacing IGBTs.Anyone have repaired the waffle plate?
coulomb said:The relay is to short out the pre-charge resistors when pre-charge is over.shuma89 said:I also see on the plate 3 big resistors 1 black relay and 1 big 310v 1.0 mf capacitor. I want to know what is function of relay and also want to see the schematic of them.
There isn't a good schematic for the Nissan OBC, but it is fairly similar to the Mitsubishi iMiEV OBC, so you can use the schematic of the pre-charge circuit here as a guide. There is an index on page one of that topic to guide you to other topics that may be of interest.
While you may well be able to replace the input diodes with a bridge rectifier off the Waffle Plate™, I suspect that replacing the IGBTs will be impractical. You'll likely have to find a second-hand plate from another charrger, or perhaps a whole charrger from a wrecker. It's not clear to me that the iMiev Waffle Plate™ will be similar enough to the Nissan one.Where can i see the waffle plate's igbt models?
I've never hear of a source for a new plate.I also want to know, if it possible where can anyone buy the waffle plate a new one.
Someone did replace just some small capacitors in one; see the iMiev topic, near the end. For example, here. But that was a pretty mild repair compared with replacing IGBTs.Anyone have repaired the waffle plate?
thenk you for information.
I want to clean all epoxy from waffle plate.
my frand asked me that the black epoxy may be softened by Dichlorethan, i will try this.
second question.
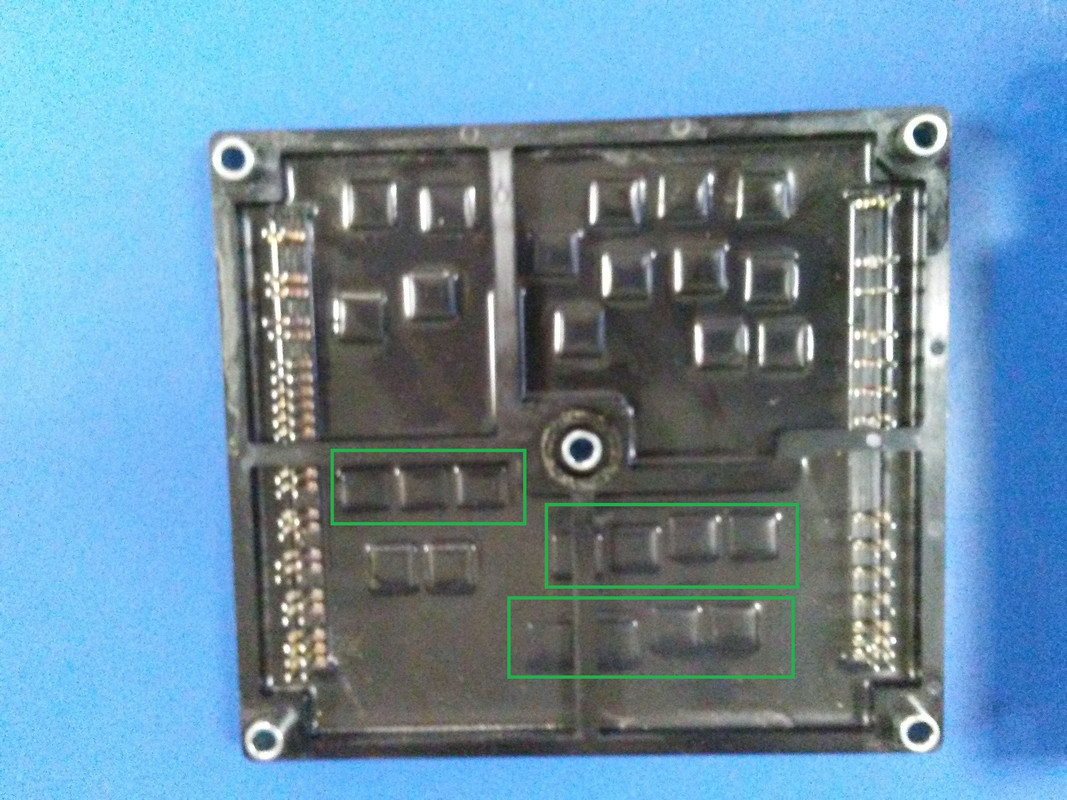
on picture is red squared pins have shorted and red arrowed diode is blown, it shows short conection, ia have unsoldered this and it is definitely shorted.
i have unsoldered also the black two capasitors, thei are not shorted.

i want to know, what may be a reason to blow the arrowed smd diode or diodes/igbt-s on waffle plate.
And just to double check, are the N1 and P1 pins on the left side shorted to the T1 and T4 pins on the right hand side of the waffle plate?
i would guess that an old, weak or worn out 12V battery failed and there was a sudden interruption of the 12V power supply to the OBC during charging that caused an uncontrolled shutdown at full power.
The OBC parts were then damaged by the high voltage inductive spike created from the stored energy in the collapsing magnetic fields in the big L1 inductor and the T1 and T4 transformer windings.
Or the 5V power supply created on the upper control board failed and caused the AC relay to suddenly open. This could also cause an uncontrolled shutdown while charging at full power.
There may also be damage to the upper control board, or at the very least it is suspect if used in another unit.
i've not had any success to remove the black epoxy so let us know how the chemical does.
[edit]
That's why i asked about your experience level with electronics repairs--it takes a vacuum desoldering station to remove the 72 solder joints on the waffle plate.
nlspace said:And just to double check, are the N1 and P1 pins on the left side shorted to the T1 and T4 pins on the right hand side of the waffle plate?
I checked 3-4 times thet N1 and P1 pins on the left side shorted to the T1 and T4 pins on the right hand side of the waffle plate
[edit]
That's why i asked about your experience level with electronics repairs--it takes a vacuum desoldering station to remove the 72 solder joints on the waffle plate.
my experience level with electronics repairs is not so good as i want, but i am learning everything .
i will bay vacuum desoldering station,
it is ver cheap but in my mind it will work well.
https://www.aliexpress.com/i/4001163291608.html
goldbrick
Well-known member
Wow, that's a great price. I have used the old spring-loaded ones but they are marginal at best. We have great equipment at my work place and since no one is around, I can use it anytime I want. But for home use, that looks great.
One trick that can sometimes help is to actually add a bit of solder before trying to suck the old solder out. This can help with the heat transfer to the old solder so it melts completely.
One trick that can sometimes help is to actually add a bit of solder before trying to suck the old solder out. This can help with the heat transfer to the old solder so it melts completely.
shuma89 said:my experience level with electronics repairs is not so good as i want, but i am learning everything.
Given the complexity of the OBC and its being HV electronics, not a good basis for learning electronics.
I'm encountering intermittent L2 charging problems as of yesterday. I'm just at the beginning of trouble-shooting but I'd like to at least know how to remove the OBC to have a good look at it if needed. A small voice is telling me to look for a gnawed wire.
Does anybody have a link to a good video of the steps involved ?
Does anybody have a link to a good video of the steps involved ?
SageBrush said:I'm encountering intermittent L2 charging problems as of yesterday. I'm just at the beginning of trouble-shooting but I'd like to at least know how to remove the charger port to have a good look at it if needed. A small voice is telling me to look for a gnawed wire.
Does anybody have a link to a good video of the steps involved ?
I got a good look at the wiring by removing two panel pieces that are connected: one panel surrounds the ports and the other panel sits above it just under the hood. The two pieces can be separated. That way the metal charging hood can be left in place.
nlspace said:This schematic is on page 1 of my OBC troubleshooting thread. The black epoxy on the waffle plate is very difficult to remove, let me know if you find a way to do it. The part number of the 600V 20A diodes is Shindengen DF20L60; The IGBTs were identified but i can't remember just now, will have to get back to you.
hello my frand.
you asked me that The part number of the 600V 20A diodes is Shindengen DF20L60 and the IGBT-s part numbers you dont knew thet time. could you reminded its part numbers?
i searched my files for a datasheet but didn't find it. Maybe the part was etched and we never found out the exact part number. If i can find my waffle plate this weekend then i can refresh my memory. The miev site is down right now.
[Edit]
i found the post, http://myimiev.com/forum/viewtopic.php?f=23&t=4079&p=36745&hilit=etched+parts#p36745 and indeed the transistors are missing the part numbers. i suspect they were not Japanese parts and that's why they were etched.
If you figure out an easy way to get thru the epoxy then i can remove them and test on a curve tracer to find a good substitute part.
hello avryone
I want to bay new parts for Onboard charger.
1) resistors with thermal fuse
2) IGBT transistors for The Waffle Plate.
I do not know what is the part number of this IGBT transistors. can anyone tell me what part number is thet transistors?
I want to bay new parts for Onboard charger.
1) resistors with thermal fuse
2) IGBT transistors for The Waffle Plate.
I do not know what is the part number of this IGBT transistors. can anyone tell me what part number is thet transistors?
Hello averyone.
I have obc with blown precharge resistors. I checked waffle plate, it has not open or short circut. But whan i changed pre charge resistors they also blows. 4.7 om 5 watt, is this correct resistors?
I testet relay, it works. I changed upper board, it also blows precharge resistors. Wherr i can find the problem? There is not short circut on waffle plate.
Dear Everyone...
I'm disassembling a waffle-plate and trying to identify it's parts:
1. Input diodes 25v60 600V 25A 4pcs
2. Resistors between 8-7 and 17-18 pins are 100k NTC temperature sensors.
3. Output diodes F20L60U 600V 20A 10pcs
4. PFC mosfets are RJP6012 600V 40A 3pcs
5. Two PFC diodes are damaged in my waffle-plate... 600V ~40A fast I thing...
6. H-bridge mosfets are damaged too... 8pcs RJP6012 may be used I think.
7. TR545 and TR546 are 2SC5053
8. C517 10u
9. TR541, 542, 543, 544 - BCX53-16
I'm going to re-make a waffle-plate to make OBCs more repairable ) Have anybody any information about damaged things to identify them?
Thank you.
Max.
hello everyone.
i have problem inside of onboard charger. i change 4,7ohm resistor, it was burned. car charged 3-4 times and it burned again, i change this resistor, after 2-3 charge it blows, there is 3 pieces of 4,7 ohm 5W resistor, i have changed all of them wigh 10W resistors 4,7 ohm. thei also blows after 2-3 charge. can anybody tell me what may be a reason? other charger works in my car perfectly.
i have problem inside of onboard charger. i change 4,7ohm resistor, it was burned. car charged 3-4 times and it burned again, i change this resistor, after 2-3 charge it blows, there is 3 pieces of 4,7 ohm 5W resistor, i have changed all of them wigh 10W resistors 4,7 ohm. thei also blows after 2-3 charge. can anybody tell me what may be a reason? other charger works in my car perfectly.
Similar threads
- Replies
- 8
- Views
- 3K
- Replies
- 13
- Views
- 6K
- Replies
- 9
- Views
- 2K
- Replies
- 14
- Views
- 4K