I had the
P31E1 000B HV System Interlock Error EVC-305 error 4 weeks ago and resolved it fairly easily. In my case, the interlock was physically broken. Here is the fix and I will add the photos shortly if I can figure out how to do so.
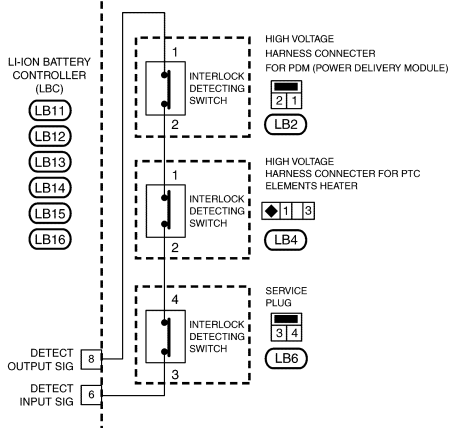
On the front of the battery pack are three connectors. The connector on the right goes to the PTC (there are two power wires which are the purpose of the connector). There is also an interlock circuit built into the connector which checks to make sure the connector is seated. The interlock includes a small grey wire, which my case had corroded through. See page EVB-27 of this document
https://www.speakev.com/attachments/nissan-leaf-technical-manual-evb-pdf.139268/ for the interlock circuit this DTC is referring to.
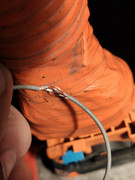
A good image of a corroded grey wire
https://autosphere.ca/wp-content/uploads/2022/08/batterie-haute-tension_circuit-interlock_WP-2.jpg
The wire is on top of the PTC cable and difficult to see without disconnecting the PTC cable and pulling it down. In my case I had to very closely examine the wire and did find it was completely rotted through--although the insulation was still visibly intact. I have preserved the failed wire to look at under magnification if anyone is interested. I suspect the plastic insulation is defective somehow, and cracks where it was stressed during installation.
So,
>>>disconnect the 12 V
>>>drop the front splash shield (first of three shields on the battery--not the one under the motor)
>>>put on your HV gloves, pull the safety disconnect between the rear seats. Be patient with figuring out the safety disconnect, there is a latch under the latch that needs to be tickled before the handle will swing up freely. It feels stuck somehow, but there is a hidden latch.
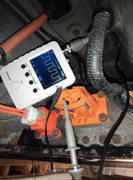
>>>Under the car, pull the PTC connector off, and check that grey wire very carefully. See page EVB-183 of this document to work the latch on the PTC connector
https://www.speakev.com/attachments/nissan-leaf-technical-manual-evb-pdf.139268/ Use a bright light and wear safety glasses. Road grit is going to fall off that connector and right into your Mark 1s.
I shortened the grey wire to remove the damage, soldered it, and heat-shrinked it. The only tricky part is grasping the stubs of grey wire in order to use the wire strippers. I used a pair of needle nose pliers with tapes on the jaws to gently but firmly grasp the grey wire while stripping it--this way no stress is placed on the part of the grey wire going into the connector. Use marine heat shrink and protect the rest of the cable with numinum foil before applying heat. Tape the shortened grey wire down to the connector shell. Reconnect everything, codes could now be cleared.
If the grey wire fails closer to the connector, then it will likely be necessary to de-pin and install a new interlock wire. Or, perhaps, de-pin the power conductors and use a new connector.
Mods, please update the OP's title to read "P31E1 000B HV System Interlock Error EVC-305--2013, 2014--no start"