


stjohnh
Well-known member
Hi Guys,
I added a wireless backup camera to my wife's 2013 SV, easy and cheap, I checked the wireless and compared it to wired before I installed it and could tell no difference. There is a little wiring, no soldering needed, and no wires run from the front to the back of the car.
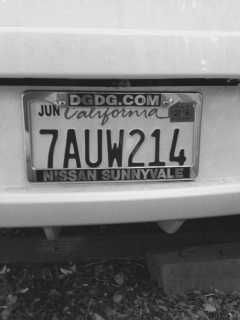
As you can see, camera is nearly invisible.
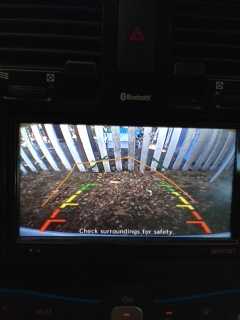
Here is the image that appears on the radio when you put the shifter into reverse:
Here is a closeup of the camera after installed, taken from about 10 inches off the ground:

Total cost, a little over $30
Time involved estimated 2-3 hours, depending on your experience with car electronics
Purchased items:
Camera, $20 http://www.amazon.com/gp/product/B00GSFIJS6?psc=1&redirect=true&ref_=oh_aui_detailpage_o05_s00
Wireless video transmitter/receiver $11 http://www.amazon.com/gp/product/B008Z9E4DW?psc=1&redirect=true&ref_=oh_aui_detailpage_o04_s00
mIsc supplies:
solderless connectors
electrical tape
super glue
Duct tape
cable ties
Female RCA plug (I cut one off one of the many video cables with yellow jacks, leave a few inches of wire attached)
a little wire to make ground lead, etc.
Tools needed
Brain
Hands
electric drill and bit about 1/2" for sheet metal (one hole in trunk)
Pliers
Phillips screwdriver
Plastic trim removal tool
wire cutters
AT NAV UNIT (STEREO/CLIMATE CONTROL PANEL)
1. disconnect neg (-) cable at battery- prevents blown fuses if you screw up
2. at lower edge of panel pull with hands back, lower edge will come loose.
3, at top of panel pull with hands back until it comes away about 1 inch from dash
4. lift panel vertically about 1" to free hooks holding panel
5. remove small harness at top of panel going to the emergency blinker switch between the vents.
6. remove 4 phillips screws holding radio in place. Pull radio out just enough to get access to the harness at the back of the radio. You should see this:
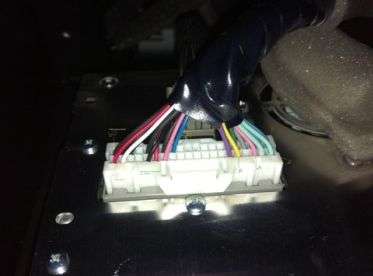
In the next steps you will be cutting one wire, and installing 4 solderless clips to the harness:
7. use wire cutters cut the protective taping around the wires so that you have about 2" of wire exposed. Do not cut any wires.
8. use solderless connector to attach center wire from your new female RCA jack (that you cut off an old video cable) to the red wire at the left corner.
9. similarly the shield wire of the RCA Jack goes to black wire next to the red one at the left.
10. Identify the 3rd black wire from the left, this is the trigger wire that tells the radio to display the back up view. Cut this wire about 2" from the plug. Use a solderless connector to attach a 10 inch wire to the 2 inch stub coming out of the plug, this extension will be attached to ground later. Tape the end that is still in the harness.
11. On the wireless receiver (it says receiver on a label), attach the red wire to the purple wire coming out of the plug.
When done the connector should look like this (there are 4 solderless connectors, but they don't show well in this photo):
12. Plug the yellow video RCA male plug from the wireless receiver into the female RCA plug you attached in steps 8, 9. Use duct tape to tape them together so they don't wiggle loose.
13. Now identify the black wire going to the wireless receiver, and the wire you attached in step 10. Twist the ends together and attach to a crimp connector or just get them ready to attach under a screw when you put the radio back in.
14. Put the wireless receiver in the space at the upper right, in space above the glove box, you don't want a lot a metal near the receiver to interfere with the signal. On the vertical plastic part of the dash, above the glove box, you will find some sound insulation with tape-like goo attaching it to the vertical wall. Pull it away from the plastic and put the receiver there, and restick the insulation, holding the receiver to the vertical wall above the glove box. Location of the receiver is important to avoid static and flashing of the camera signal. Now reinstall the radio with the 4 screws (be careful, if you drop one they are difficult to recover, easier to just put in a new screw). Attach the 2 ground leads under the screw at the upper left:
15. Pick up the panel, position it so that it is 1-2 inches away from the dash, reinstall the emergency blinker connector, be sure the 2 hooks on either side of the panel are in their slots, and snap the upper edge of the panel in place, then the lower edge.
DONE WITH THE NAV RADIO PANEL WIRING ;-). Take a break. You are about 1/2 done.
INSTALLING CAMERA AND TRANSMITTER AT REAR OF CAR.
1. Lift hatch and remove the rear carpet and carpet pad. Remove the center trim panel at the rear lip of the trunk, it is the piece that has an opening for the hatch ring. It has 2 plastic buttons that pry out. Be careful to lift the trim piece UP after removing the button pins to release the hooks.
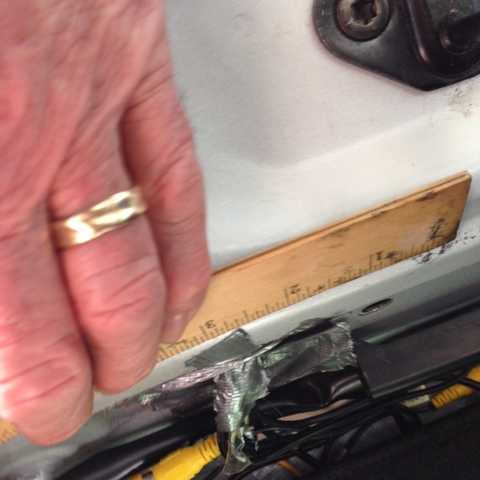
2. Use your drill to drill 1/2" hole from inside the trunk through 3 layers of sheet metal, this hole is for the camera wires which go from the camera above the licence plate to the car interior. The hole location I used is 3" to the right of the hatch ring and 1" down from the bend in the interior sheet metal, see photos below:
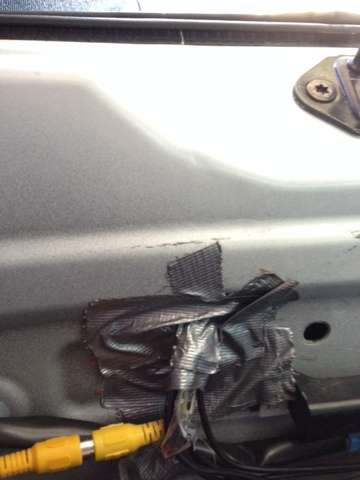
Taped and finished hole location:
Location with ruler, close up:

3. Take the camera and a 10" strip of duct tape and wrap the tape around the camera leads to protect them from the sharp edges of the hole you drilled, then, from outside the car, insert the camera leads into the space above the licence plate and through the holes so that the connectors are inside the car.
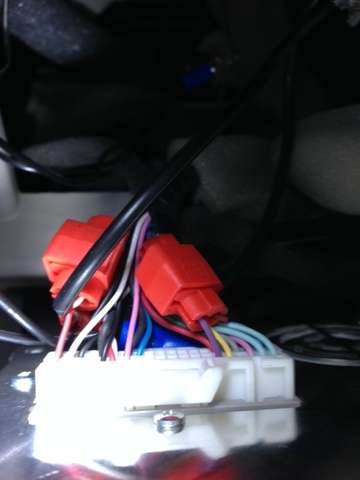
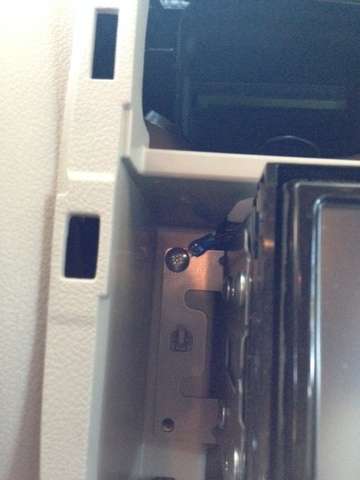
4. On the right corner trim panel, remove the EVSE ring that holds the EVSE cord bag in place, then use your trim removal tool to pry the panel away from the rear of the car. You don't need to remove the whole panel just enough so that you can see the harness and connector shown:
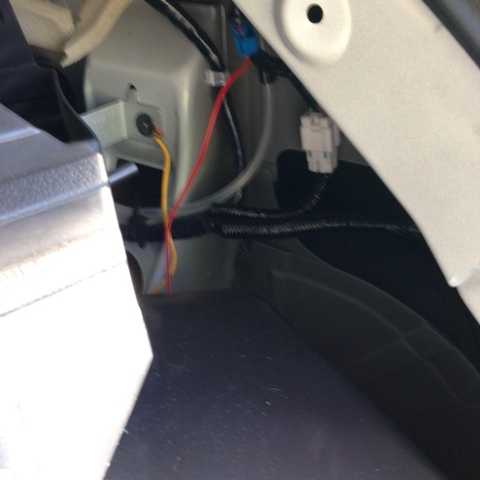
5. Use trim tool to separate the plugged section from the body (don't need to separate connectors). Identify the red wire with purple stripe and the black wire:
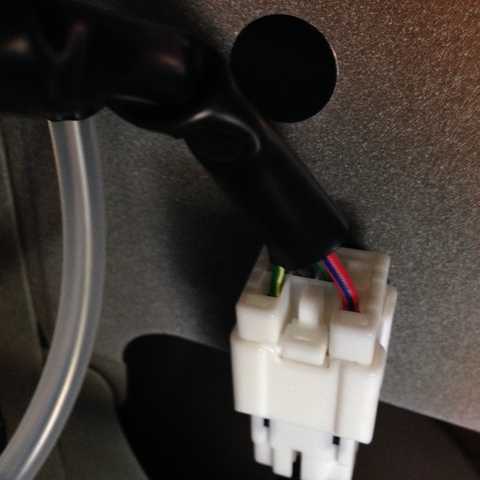
6. Now take the transmitter power leads and connect the red wire to the red/purple wire on the connector. Attach the black to black. The Red/purple is the wire that carries +12 volts only when the shifter is in reverse.
7. Push the connector back into the metal of the car. Replace the rear quarter panel trim and EVSE bag ring, threading the transmitter wires under the quarter panel.
8. Plug the transmitter into the power connector you just attached to the harness and plug the camera connector into the transmitter. Connect the yellow video connections. Tape the connectors so they don't wiggle loose as you drive.
9. You need to bend the camera mounting clip so that when the clip face is glued to the inside wall of the licence plate support that the camera faces down at about a 45 degree angle. The camera will probably need to be reoriented so that up is up on the display. Reconnect the battery negative lead, put the parking brake on firmly, and put the car in run. Shift into reverse. The radio should show the camera view. Now hold the camera so that the metal clip is oriented in the position it will be when glued in place and check the view on the display. Unscrew the black plastic ring around the lens slightly so that the camera body can be rotated, and rotate it so that up is up on the display when the camera mounting clip is properly positioned. Tighten the ring when correct.
10. Turn off car and check desired location of camera. I superglued the metal clip to the inside wall of the licence plate plastic, seems easy and perfect. Be sure you measure so that camera is at the exact center of the car.
11. duct tape the hole on the inside of the car, so that the camera wires are not touching the sharp metal of the hole.
12. Tape the transmitter to the plastic just inside the space between the rear of the quarter panel and the rear lip of the trunk, with the antenna horizontal (to match the horizontal antenna orientation of the receiver above the glove box). Dress the wires so that they are not dangling all over and replace the rear middle trim.
13. Wait about an hour for the superglue to harden, and if necessary, bend the bracket so that the camera is pointing down at about a 45 degree angle.
14. Restart the car, put in reverse and check that all is working and that up is up on the camera view.
DONE !!!
I wrote this from memory, so let me know if I skipped any steps or where my instructions aren't clear.
I added a wireless backup camera to my wife's 2013 SV, easy and cheap, I checked the wireless and compared it to wired before I installed it and could tell no difference. There is a little wiring, no soldering needed, and no wires run from the front to the back of the car.
As you can see, camera is nearly invisible.
Here is the image that appears on the radio when you put the shifter into reverse:
Here is a closeup of the camera after installed, taken from about 10 inches off the ground:
Total cost, a little over $30
Time involved estimated 2-3 hours, depending on your experience with car electronics
Purchased items:
Camera, $20 http://www.amazon.com/gp/product/B00GSFIJS6?psc=1&redirect=true&ref_=oh_aui_detailpage_o05_s00
Wireless video transmitter/receiver $11 http://www.amazon.com/gp/product/B008Z9E4DW?psc=1&redirect=true&ref_=oh_aui_detailpage_o04_s00
mIsc supplies:
solderless connectors
electrical tape
super glue
Duct tape
cable ties
Female RCA plug (I cut one off one of the many video cables with yellow jacks, leave a few inches of wire attached)
a little wire to make ground lead, etc.
Tools needed
Brain
Hands
electric drill and bit about 1/2" for sheet metal (one hole in trunk)
Pliers
Phillips screwdriver
Plastic trim removal tool
wire cutters
AT NAV UNIT (STEREO/CLIMATE CONTROL PANEL)
1. disconnect neg (-) cable at battery- prevents blown fuses if you screw up
2. at lower edge of panel pull with hands back, lower edge will come loose.
3, at top of panel pull with hands back until it comes away about 1 inch from dash
4. lift panel vertically about 1" to free hooks holding panel
5. remove small harness at top of panel going to the emergency blinker switch between the vents.
6. remove 4 phillips screws holding radio in place. Pull radio out just enough to get access to the harness at the back of the radio. You should see this:
In the next steps you will be cutting one wire, and installing 4 solderless clips to the harness:
7. use wire cutters cut the protective taping around the wires so that you have about 2" of wire exposed. Do not cut any wires.
8. use solderless connector to attach center wire from your new female RCA jack (that you cut off an old video cable) to the red wire at the left corner.
9. similarly the shield wire of the RCA Jack goes to black wire next to the red one at the left.
10. Identify the 3rd black wire from the left, this is the trigger wire that tells the radio to display the back up view. Cut this wire about 2" from the plug. Use a solderless connector to attach a 10 inch wire to the 2 inch stub coming out of the plug, this extension will be attached to ground later. Tape the end that is still in the harness.
11. On the wireless receiver (it says receiver on a label), attach the red wire to the purple wire coming out of the plug.
When done the connector should look like this (there are 4 solderless connectors, but they don't show well in this photo):
12. Plug the yellow video RCA male plug from the wireless receiver into the female RCA plug you attached in steps 8, 9. Use duct tape to tape them together so they don't wiggle loose.
13. Now identify the black wire going to the wireless receiver, and the wire you attached in step 10. Twist the ends together and attach to a crimp connector or just get them ready to attach under a screw when you put the radio back in.
14. Put the wireless receiver in the space at the upper right, in space above the glove box, you don't want a lot a metal near the receiver to interfere with the signal. On the vertical plastic part of the dash, above the glove box, you will find some sound insulation with tape-like goo attaching it to the vertical wall. Pull it away from the plastic and put the receiver there, and restick the insulation, holding the receiver to the vertical wall above the glove box. Location of the receiver is important to avoid static and flashing of the camera signal. Now reinstall the radio with the 4 screws (be careful, if you drop one they are difficult to recover, easier to just put in a new screw). Attach the 2 ground leads under the screw at the upper left:
15. Pick up the panel, position it so that it is 1-2 inches away from the dash, reinstall the emergency blinker connector, be sure the 2 hooks on either side of the panel are in their slots, and snap the upper edge of the panel in place, then the lower edge.
DONE WITH THE NAV RADIO PANEL WIRING ;-). Take a break. You are about 1/2 done.
INSTALLING CAMERA AND TRANSMITTER AT REAR OF CAR.
1. Lift hatch and remove the rear carpet and carpet pad. Remove the center trim panel at the rear lip of the trunk, it is the piece that has an opening for the hatch ring. It has 2 plastic buttons that pry out. Be careful to lift the trim piece UP after removing the button pins to release the hooks.
2. Use your drill to drill 1/2" hole from inside the trunk through 3 layers of sheet metal, this hole is for the camera wires which go from the camera above the licence plate to the car interior. The hole location I used is 3" to the right of the hatch ring and 1" down from the bend in the interior sheet metal, see photos below:
Taped and finished hole location:
Location with ruler, close up:
3. Take the camera and a 10" strip of duct tape and wrap the tape around the camera leads to protect them from the sharp edges of the hole you drilled, then, from outside the car, insert the camera leads into the space above the licence plate and through the holes so that the connectors are inside the car.
4. On the right corner trim panel, remove the EVSE ring that holds the EVSE cord bag in place, then use your trim removal tool to pry the panel away from the rear of the car. You don't need to remove the whole panel just enough so that you can see the harness and connector shown:
5. Use trim tool to separate the plugged section from the body (don't need to separate connectors). Identify the red wire with purple stripe and the black wire:
6. Now take the transmitter power leads and connect the red wire to the red/purple wire on the connector. Attach the black to black. The Red/purple is the wire that carries +12 volts only when the shifter is in reverse.
7. Push the connector back into the metal of the car. Replace the rear quarter panel trim and EVSE bag ring, threading the transmitter wires under the quarter panel.
8. Plug the transmitter into the power connector you just attached to the harness and plug the camera connector into the transmitter. Connect the yellow video connections. Tape the connectors so they don't wiggle loose as you drive.
9. You need to bend the camera mounting clip so that when the clip face is glued to the inside wall of the licence plate support that the camera faces down at about a 45 degree angle. The camera will probably need to be reoriented so that up is up on the display. Reconnect the battery negative lead, put the parking brake on firmly, and put the car in run. Shift into reverse. The radio should show the camera view. Now hold the camera so that the metal clip is oriented in the position it will be when glued in place and check the view on the display. Unscrew the black plastic ring around the lens slightly so that the camera body can be rotated, and rotate it so that up is up on the display when the camera mounting clip is properly positioned. Tighten the ring when correct.
10. Turn off car and check desired location of camera. I superglued the metal clip to the inside wall of the licence plate plastic, seems easy and perfect. Be sure you measure so that camera is at the exact center of the car.
11. duct tape the hole on the inside of the car, so that the camera wires are not touching the sharp metal of the hole.
12. Tape the transmitter to the plastic just inside the space between the rear of the quarter panel and the rear lip of the trunk, with the antenna horizontal (to match the horizontal antenna orientation of the receiver above the glove box). Dress the wires so that they are not dangling all over and replace the rear middle trim.
13. Wait about an hour for the superglue to harden, and if necessary, bend the bracket so that the camera is pointing down at about a 45 degree angle.
14. Restart the car, put in reverse and check that all is working and that up is up on the camera view.
DONE !!!
I wrote this from memory, so let me know if I skipped any steps or where my instructions aren't clear.
 I have the camera in the back hooked up identically and will try the head unit or drivers kick plate in the future when I know what I am doing.

